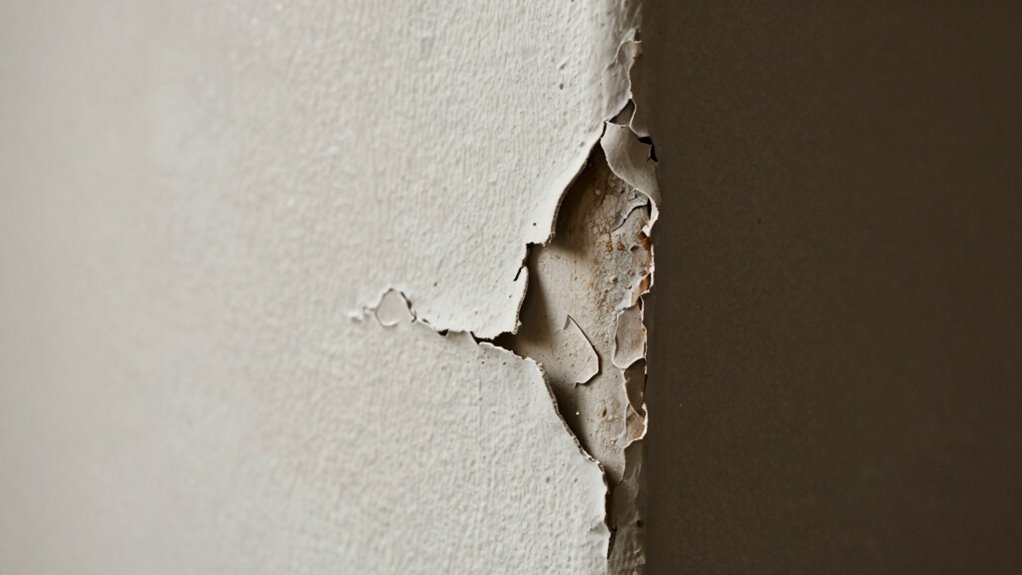

Patch corners peel first because they’re areas of natural stress and are more exposed to damage. Poor surface preparation, like not cleaning or sanding properly, weakens paint adhesion at these points. Additionally, improper installation and environmental factors, such as humidity and temperature, can accelerate peeling. To prevent this, guarantee thorough prep, use high-quality primer, and apply thin, even coats of paint. Keep exploring to discover more tips for long-lasting drywall repairs.
Key Takeaways
- Corners are more vulnerable to stress and damage, causing peeling to initiate there first.
- Poor surface preparation, like dust or grease, weakens paint adhesion at corners.
- Insufficient or uneven primer application can lead to poor bonding and early peeling.
- Applying thick coats or skipping proper drying increases the risk of corner peeling.
- Environmental factors, such as humidity and temperature fluctuations, accelerate peeling at corners.
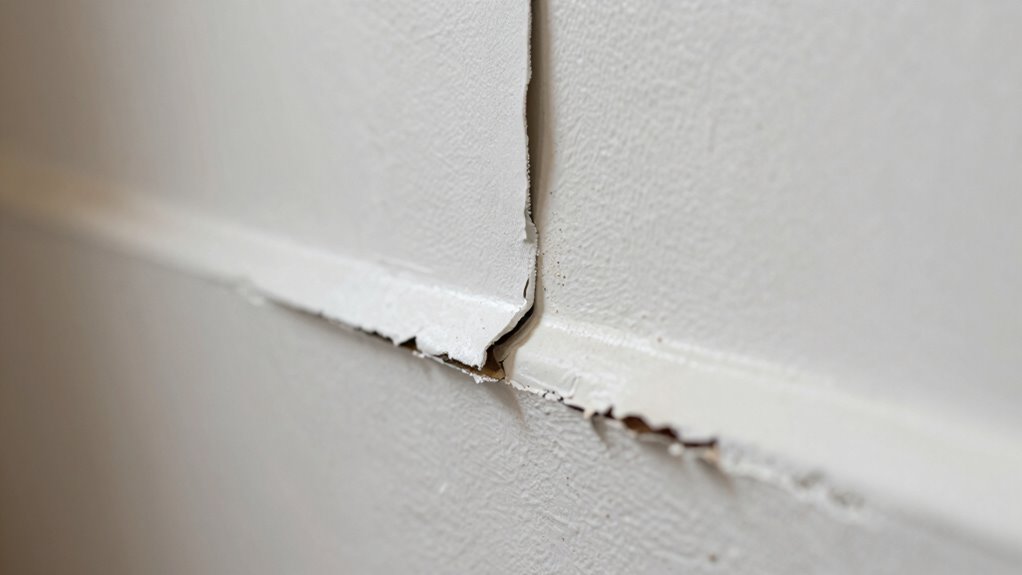
When repairing drywall, it’s essential to start with the corners because they tend to be the most vulnerable to damage. Corners are often the first to show signs of peeling or cracking, especially if the drywall has experienced stress or improper installation. One common issue you may notice is the corners peeling before other areas, which can be frustrating. To prevent this, understanding why corners peel first and how to prepare properly is key.
Paint adhesion is a major factor here. If the paint doesn’t stick well to the surface, it’s more likely to peel over time. Corners are especially prone because they’re exposed to more stress and wear. To improve paint adhesion, you need to focus on surface preparation. Skipping proper surface prep leaves dust, grease, or old paint residues that weaken the bond between the drywall and the new coat. Before painting, clean the corners thoroughly with a damp cloth to remove dust and dirt. If old paint is in poor condition, gently sand the area to create a rough surface. This roughness helps the new paint grip better and reduces the chance of peeling.
Proper surface prep, including cleaning and sanding, is essential to improve paint adhesion and prevent peeling at corners.
Applying primer is another crucial step in surface preparation. Primer seals the drywall surface and provides a uniform base for the paint to adhere to. It’s especially important at corners, where the surface can be uneven or damaged. Use a high-quality primer designed for drywall, and make sure to cover all corners evenly. Wait for the primer to dry completely before applying the final coats of paint. This extra step makes a significant difference in preventing peeling and ensures a longer-lasting finish. Additionally, understanding paint adhesion and how environmental factors can influence it can further help in achieving a lasting paint job. Proper environmental conditions, such as temperature and humidity, can also impact paint curing, so controlling these factors during application can improve durability.
When you paint corners, avoid applying thick coats, which can crack or bubble as they dry. Instead, use multiple thin coats, allowing each to dry fully before applying the next. This technique helps create a durable, cohesive finish that resists peeling. Also, consider using painter’s tape to keep edges clean and prevent paint from bleeding into unwanted areas. Proper surface preparation combined with careful painting techniques creates a strong bond that withstands everyday wear and tear. Being aware of surface preparation techniques and environmental influences can improve the longevity of your paint job and prevent future issues. Moreover, maintaining consistent painting conditions during application can further aid in achieving a smooth, durable finish.
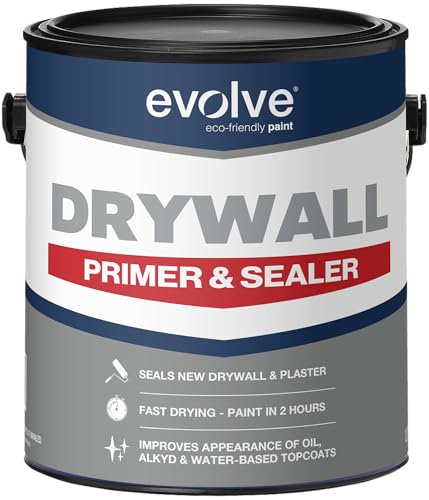
EVOLVE Drywall Primer & Sealer, 1 Gallon – Professional Fast-Dry Drywall Primer, Low VOC & Low Odor, Excellent Adhesion & Hide, Smooth Sealing Base for Walls & Ceilings
- Dual Primer and Sealer: High-solids formula for sealing and priming
- Suitable for Drywall and Plaster: Engineered for new drywall and plaster surfaces
- Hides Surface Imperfections: Conceals joint lines, tape, and repairs
As an affiliate, we earn on qualifying purchases.
As an affiliate, we earn on qualifying purchases.
Frequently Asked Questions
How Long Should I Wait Before Painting Patched Corners?
You should wait at least 24 hours before painting patched corners. Proper surface preparation is vital, so make certain the patched area is completely dry and smooth. Use effective patching techniques to avoid issues like peeling. If you’re in a humid environment or working with thicker patches, consider waiting longer—up to 48 hours. Rushing this step can cause peeling and poor adhesion, so patience guarantees a durable, professional finish.
Can Temperature Affect Patch Corner Peeling?
Absolutely, temperature fluctuations can sabotage your paint job by affecting paint adhesion, especially at patch corners. When it’s too hot or cold, the paint struggles to stick, causing peeling to start there first—like a rebellious corner refusing to stay glued. To prevent this, paint in moderate temperatures, ideally between 50-85°F, and avoid painting during drastic weather changes. Keep the environment stable, and your patches won’t peel like a bad wig.
What Types of Patching Materials Are Best for Corners?
For corner repair, use flexible patching materials like vinyl or flexible fabric patches, as they adhere well and move with the corner’s shape. Avoid rigid patches that can crack or peel over time. Make sure you select patches specifically designed for corner applications, providing better contouring and durability. Proper surface preparation and sealing the edges also help prevent peeling, making your corner repair last longer and look seamless.
How Do I Remove Peeling Patches Without Damaging the Wall?
You should gently scrape off the peeling patches with a putty knife, being careful not to damage the wall texture. Lightly sand the area to smooth edges and improve paint adhesion. Clean the surface thoroughly to remove dust and debris. Applying a primer compatible with your wall finish helps guarantee better paint adhesion. This process prevents further peeling, maintaining a smooth, durable finish and preserving your wall’s appearance.
Is Primer Necessary Before Repainting Patched Corners?
Yes, primer application is necessary before repainting patched corners. It guarantees proper surface preparation by sealing the patched areas and creating a uniform base for the new paint. This step helps prevent peeling and ensures better adhesion, especially on repaired or uneven surfaces. Skipping primer might result in visible differences or early peeling, so taking the time for surface preparation with primer guarantees a smooth, durable finish that lasts longer.
Conclusion
To keep your patches looking fresh longer, pay close attention to the corners during application and avoid overloading with adhesive. Imagine applying a waterproof patch on your bike’s tire, only for the corners to peel after just a few rides—disappointing, right? By smoothing out air bubbles and pressing firmly, you prevent that frustration. Proper prep and technique guarantee your patch stays intact, so you can enjoy a reliable fix without worrying about peeling edges.