This guide shows beginners how to prepare for and use an LED light therapy mask at home, then clean and store it. You will learn how to follow the device’s timing and eye-safety directions and set a repeatable routine. Allow 10-20 minutes per session, depending on your mask. Results vary, and a home device is not a substitute for care from a dermatologist.

Get beauty and skincare favorites delivered free with Prime
- Fast, free delivery on millions of items
- Prime Video, Amazon Music and more included
- Member-only deals all year

Shark CryoGlow LED Face Mask with Under-Eye Cooling
- ✔ Model: FW312PL
- ✔ Light types: Red, blue, deep infrared
- ✔ Treatment modes: Better Aging, Skin Clearing, Skin Sustain, Under-Eye Revive
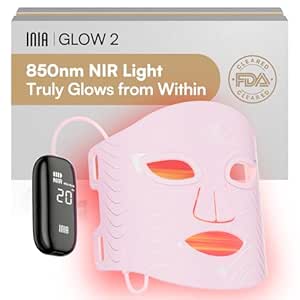
INIA Red Light Therapy Mask for Face, 850nm NIR, Red/Blue LED Light 4 Modes
- ✔ Red wavelength: 630nm
- ✔ Near-infrared wavelength: 850nm
- ✔ Additional wavelengths: 620nm and 460–470nm blue

Nameiec Cordless Red Light Therapy Mask for Face
- ✔ Device type: Cordless LED face mask
- ✔ Light therapy: Red light
- ✔ Design: 4D ergonomic contour
Difficulty: Beginner | Time: 10-20 minutes per session
What You’ll Need
Tools & Materials:
- LED light therapy mask and its manufacturer’s instructions
- Timer, if the mask does not stop automatically
- Gentle cleanser and clean towel
- Device-approved eye protection, if required
Knowledge:
- Basic ability to follow device instructions
- Awareness of any eye, skin, or medication-related sensitivity to light
Check the mask’s intended use, treatment schedule, cleaning method, and eye-protection requirements before the first session. Contact a healthcare professional before use if you have an eye condition, a light-sensitive health condition, or take medication that can increase sensitivity to light. Ask your clinician or pharmacist about your specific medication. Do not use the device over damaged or irritated skin unless a clinician and the manufacturer say it is appropriate.
Shark CryoGlow LED Face Mask with Under-Eye Cooling
For buyers who want more than one light-based approach, Shark CryoGlow offers the widest treatment menu in this group. Red, blue, and deep infrared are paired with Better Aging, Skin Clearing, Skin Sustain, and Under-Eye Revive modes. That makes it easier to compare a routine aimed at different concerns within one device, while the clip-on cooling pads add a distinct under-eye feature that neither INIA nor Nameiec lists.The flexibility comes with more steps to manage. Shark calls for a clean, bare, dry face, and its treatments take 4 to 15 minutes, so it is less of a set-and-forget option than Nameiec’s single 15-minute format. Unlike INIA, the listed details do not specify wavelengths or a range of timer choices; its distinction is the collection of named treatments and cooling levels. The adjustable fit and remote support convenience, but shoppers who want the simplest possible routine may find the mode selection unnecessary.Its FDA-cleared status is a stated product detail, while claims of clinically tested results are supplied by the product description. We would choose Shark for treatment variety and cooling, not on the assumption that more modes guarantee better results. The main compromise is that buyers need to select a program, prepare their skin, and make time for its particular session length.
Pros:
- Combines red, blue, and deep infrared light types.
- Four named treatment modes address different routine priorities.
- Clip-on under-eye cooling pads have three adjustable levels.
- Adjustable fit, remote, and USB-C charging are included.
Cons:
- Requires a clean, bare, dry face before treatment.
- Mode sessions require a dedicated 4–15 minutes.
- FSA/HSA eligibility depends on the buyer’s health plan.
Best for: Shoppers who want several named LED treatment modes and adjustable under-eye cooling in one mask.
Not ideal for: Anyone who wants a minimal, single-mode routine or does not want to prepare a clean, bare, dry face before use.
Bottom line: Choose Shark if treatment variety and under-eye cooling matter more than keeping the routine as simple as possible.
“Choose Shark if treatment variety and under-eye cooling matter more than keeping the routine as simple as possible.”
INIA Red Light Therapy Mask for Face, 850nm NIR, Red/Blue LED Light 4 Modes
INIA is the most specification-led pick for buyers comparing wavelengths. It lists 630nm red light and 850nm near-infrared, plus blue light and four modes: Red-L, Red-H, Blue, and Red+Blue, with optional NIR activation. This gives it a different appeal from Shark: the emphasis is on selectable light configurations and stated wavelengths rather than named skincare programs or cooling.The timer can be set to 10, 20, or 30 minutes, making it more adaptable to the time a buyer has available than Nameiec’s fixed 15-minute session. Its 2600mAh rechargeable controller and auto shut-off support hands-free use. INIA also lists 220 LED chips and output up to 105mW/cm²; these specifications may help shoppers compare devices, but numbers alone do not establish a personal result or determine which mask is preferable.INIA’s stated routine is a meaningful commitment: 3–7 sessions per week, with visible improvements described as taking four or more weeks of regular use. Shark offers more treatment-specific guidance and under-eye cooling, while Nameiec is simpler to understand at a glance. We would skip INIA if we wanted a clearly minimal schedule or if we were mainly shopping for cooling and convenience features.
Pros:
- Lists 630nm red and 850nm near-infrared wavelengths.
- Offers four modes with optional NIR activation.
- Three timer choices support different session lengths.
- Rechargeable controller and auto shut-off allow hands-free use.
Cons:
- Recommended use is frequent at 3–7 times per week.
- The product description says visible improvements may take four or more weeks.
- Does not list the under-eye cooling feature offered by Shark.
Best for: Buyers who want specified red and near-infrared wavelengths, multiple light modes, and flexible session timers.
Not ideal for: Shoppers who want a low-frequency routine, under-eye cooling, or product guidance centered on named treatment programs.
Bottom line: Pick INIA when wavelength and mode choice are your priorities and you are prepared to follow a frequent routine.
“Pick INIA when wavelength and mode choice are your priorities and you are prepared to follow a frequent routine.”
Nameiec Cordless Red Light Therapy Mask for Face
Nameiec keeps the choice straightforward: it is a cordless red-light mask with a 4D ergonomic contour, designed for full facial coverage and a stated 5 mm light distance. Compared with Shark’s program list and INIA’s wavelength and mode combinations, Nameiec has fewer described choices to sort through. That simplicity may suit a buyer who wants a specific red-light device and does not need a range of treatments or built-in cooling.A 15-minute session is easy to plan around, although the recommended frequency of three to five times weekly means the routine still requires consistency. The cordless format supports flexible use, but the product information does not specify battery capacity or runtime, so we cannot infer how often it needs charging. This is less detail than INIA provides about its rechargeable controller.There is also a small setup consideration: the included USB-C cable requires a 5V/1A charger that is not included. Shark includes its charging cable and remote, while Nameiec’s appeal rests on a more focused format and contoured design. We would choose it for cordless convenience and a defined session, while buyers seeking light-mode versatility or cooling should compare the other two first.
Pros:
- Cordless design supports flexible use.
- 4D contour is designed for full facial coverage.
- Defined 15-minute sessions are straightforward to schedule.
- USB-C cable is included.
Cons:
- 5V/1A charger is not included.
- Requires regular use three to five times per week.
- Product details do not state battery capacity or runtime.
Best for: People seeking a cordless red-light mask with a contoured design and a clear 15-minute session format.
Not ideal for: Buyers who want multiple light modes, under-eye cooling, or a charger included with the device.
Bottom line: Choose Nameiec for a focused, cordless red-light routine if you are comfortable supplying the required charger and using it consistently.
“Choose Nameiec for a focused, cordless red-light routine if you are comfortable supplying the required charger and using it consistently.”
As an Amazon Associate we earn from qualifying purchases.
Before You Start
Use only a mask intended for your treatment goal, and follow its instructions; devices differ in wavelengths, fit, treatment time, and safety features. Do not extend a session or add sessions to speed results. Stop if you feel pain, unusual heat, or marked irritation. If you develop a persistent or severe reaction, discontinue use and seek medical advice. Never stare into the LEDs, and do not assume closed eyes provide enough protection.
Step-by-Step Instructions
Step 1: Read the device instructions
Find the sections on intended use, session length, frequency, eye protection, charging, and cleaning. Check whether the mask is designed for your concern and whether the manufacturer requires a particular position or distance from your face. Follow the device’s directions over general advice.
Tip:Do not use a device with a cracked casing, damaged cable, or unclear controls. Contact the manufacturer for guidance.
Check: You know the recommended session time, schedule, and eye-safety requirements for your exact model.
Step 2: Check that the mask is suitable for you
Review the device warnings and your health circumstances before using it. If you have a condition that makes you sensitive to light, a history of eye problems, or take a medicine that may cause light sensitivity, ask a healthcare professional whether this device is suitable. Follow any restrictions given by your clinician.
Tip:Do not use the mask on a child or another person unless its labeling and a clinician’s advice support that use.
Check: You have checked the manufacturer’s warnings and addressed any personal health concerns before starting.
Step 3: Prepare your face and treatment area
Choose a dry, comfortable place where you can sit or lie still for the full session. Wash your hands, remove makeup, sunscreen, and other products from your face with a gentle cleanser, then pat your skin dry. Remove jewelry or hair accessories that could affect the mask’s fit. Do not apply a new product just before treatment unless the device instructions say it is suitable.
Tip:Clean, dry skin helps keep residue off the mask and reduces the chance that a product will irritate your skin during treatment.
Check: Your face is clean and dry, and the treatment area is clear of items that could interfere with the mask.
Step 4: Fit the mask and protect your eyes
Inspect the mask and its eye openings, then put it on as directed. Adjust straps or supports so it sits securely without pressing painfully on your face. Use the eye shields or goggles supplied or specified by the manufacturer. If the instructions say to keep your eyes closed, do so, but use any required eye protection as well.
Tip:Do not look directly at the LEDs, even briefly. If eye protection is missing or does not fit correctly, pause and contact the manufacturer before treatment.
Check: The mask is stable, does not block your breathing, and your eyes have the protection the instructions require.
Step 5: Run one session at the prescribed setting
Select the mode and session length specified for your device and treatment goal. Start the mask, remain still, and let the timer or automatic shutoff end the session. If the device has no timer, use a separate timer. Do not increase brightness, combine modes, or continue beyond the listed time unless the manufacturer specifically instructs you to.
Tip:Stop the session if you feel pain, uncomfortable heat, dizziness, or eye discomfort. Remove the mask and follow the device’s advice for unexpected reactions.
Check: The session ends at the instructed time, with no pain or concerning reaction.
Step 6: Finish and check your skin
Turn off and remove the mask as directed. Look for unusual redness, irritation, swelling, or discomfort. If your skin feels comfortable, apply your usual gentle moisturizer. Use sunscreen during the day as part of normal sun protection; LED treatment does not replace it.
Tip:A mild, brief sensation may differ by device and person. Do not treat burning, persistent redness, or worsening irritation as a sign that the treatment is working.
Check: Your skin has no concerning reaction, and you know whether to continue or pause based on how it feels.
Step 7: Clean and store the mask
Power the device off and disconnect it if its instructions call for that. Clean the mask using only the specified method and materials; do not immerse it or spray liquid into openings unless the manufacturer explicitly permits this. Let it dry fully, then store it in a clean, dry place away from heat, direct sunlight, and moisture.
Tip:Harsh cleaners, abrasive cloths, and excess liquid can damage the LEDs, surface, or electrical parts.
Check: The mask is clean, dry, undamaged, and stored according to its instructions.
Step 8: Track sessions and follow the schedule
Record the date, treatment mode, session length, and any skin or eye symptoms. Repeat only at the interval stated by the manufacturer or your clinician. Keep the same routine long enough to judge changes, and stop if a troublesome reaction develops. Contact a dermatologist if your concern worsens or you are unsure whether the device is appropriate.
Tip:Take occasional photos in consistent lighting if you want to compare visible changes. Avoid judging results from day to day.
Check: You have a record of the first session and a clear schedule that matches the device instructions.
Common Mistakes to Avoid
- Using the mask over makeup, sunscreen, or wet skin. — Cleanse gently and pat your face dry before each session. Follow the device instructions about products.
- Skipping the required eye protection or looking at the LEDs. — Use the specified eye shields or goggles and follow the manufacturer’s eye directions every time.
- Using longer or more frequent sessions to try to get faster results. — Stick to the stated duration and schedule; extra exposure can increase irritation without improving results.
- Cleaning the mask with unapproved liquids or putting it away damp. — Use the cleaning method in the manual and let the device dry fully before storing it.
Troubleshooting
Problem: The mask slips, presses painfully, or does not sit over the intended area.
Solution: Turn it off, reposition the straps or supports as the instructions show, and try again. Do not tighten it enough to cause pain. Contact the manufacturer if the fit remains unstable.
Problem: The mask will not turn on or stops early.
Solution: Check the charge, power connection, and control sequence in the manual. Inspect the cable and casing for damage. Stop using it and contact the manufacturer if it still fails or shows damage.
Problem: Your skin becomes irritated or unusually red after a session.
Solution: Stop using the mask and allow your skin to settle. Avoid applying products that sting. Seek medical advice if the reaction is severe, persists, or worsens; check with a clinician before restarting.
Problem: You notice eye discomfort during or after treatment.
Solution: Stop immediately and remove the mask. Do not resume until you have reviewed the device’s eye-safety directions and received medical advice if symptoms continue.
What Success Looks Like
A completed session follows the exact device instructions for fit, eye protection, mode, duration, and frequency. The mask is cleaned and stored as directed, and you have recorded the session. Your face and eyes feel comfortable afterward. A single session cannot confirm whether the treatment will help; watch for changes over the schedule recommended by the manufacturer or your clinician, and stop for concerning symptoms.
Next Steps
Continue only on the schedule listed for your device, recording sessions and any reactions. Review the mask for wear before use and clean it after each session as directed. Ask a dermatologist about persistent skin concerns, lack of improvement, or whether LED treatment suits your needs. Seek medical care for a severe or persistent skin or eye reaction.
Frequently Asked Questions
How often should I use an LED light therapy mask?
Follow the schedule in your specific device’s instructions or the schedule given by your clinician. Masks differ, so do not copy another device’s routine or increase use on your own.
Should I use the mask before or after skincare products?
Most users should start with clean, dry skin, but the device manual controls. Apply skincare after treatment only if the product is comfortable for you and compatible with the manufacturer’s directions.
Can I keep my eyes closed instead of wearing eye protection?
Only if the manufacturer says that is sufficient for your device. Use the required eye shields or goggles, and never look directly at the LEDs.
When will I see results?
Timing varies by person, concern, device, and how consistently you follow its schedule. Track changes over the period stated by the manufacturer, and consult a dermatologist if your concern persists or worsens.
What should I do if the mask causes discomfort?
Stop the session and remove the mask. Do not restart while you have pain, eye symptoms, or significant irritation. Seek medical advice for severe, persistent, or worsening symptoms.